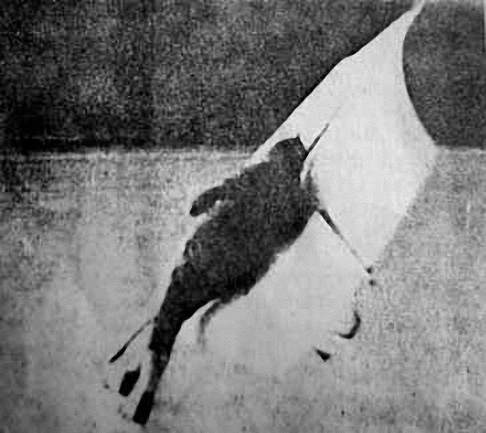
Skate Sailing is my favorite winter sport.
You put on your ice skates, lean on your sail, and the wind shoots you across
the surface of a frozen lake at high speeds. There are usually not many days between when the ice freezes thick enough to skate on and the first heavy snow, so it's a good idea to make your sail before the ice and wind are perfect.
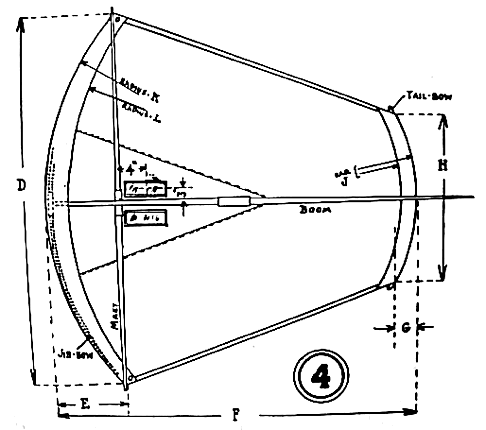
These are the dimensions for the 'Hopatcong' style skate sail (it's named after a lake in
New Jersey). I made my cheapo model for about $20 in materials from Menards.
The sail was cut from a blue reinforced polyethelene tarp, stuck together with shiny blue
Manco Duck Tape (matches the sail and holds better than regular duct tape).
Use this tape to reinforce any cut edges too. The boom and mast are closet pole.
Look for a length without splices. The jib-bow and tail-bow are 3/4" PVC.
Check the radius that the PVC tail-bow wants to assume -- it may not correspond to
Radius J in the plans. Note that the sail forms loose pockets around the tail-bow and the
jib-bow. You can get the grommets at a fabric store. The Dritz No. 660 Extra-Large
Eyelet Kit includes a grommet-setting tool. Be sure to reinforce the sail with tape
on both sides before putting in the grommets. If you want to add windows, use heavy
optically clear vinyl from the fabric store. Make the windows larger than
those shown on the plan. Use a cotton or hemp rope to lash the tail-bow to the groove
in the end of the boom. Tie the boom and mast together with a loop of this rope also.
It should be loose when they're parallel and get snug when you swing the boom
perpendicular during set-up.
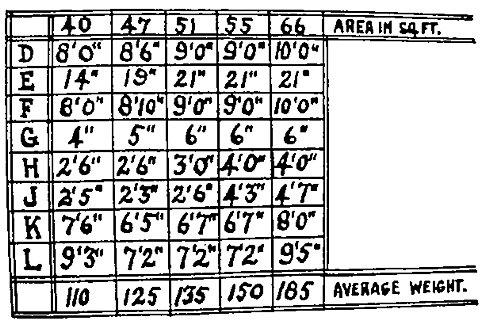
These dimensions predate the wide availability of inexpensive plastic. With a non-porous sail material like the reinforced poly, it seems like you can get by with a smaller sail for a given weight. A smaller sail is easier to control and easier to learn with. If you really get into the sport, you can make a larger sail later and keep the smaller one for high wind days and loaning to your friends.
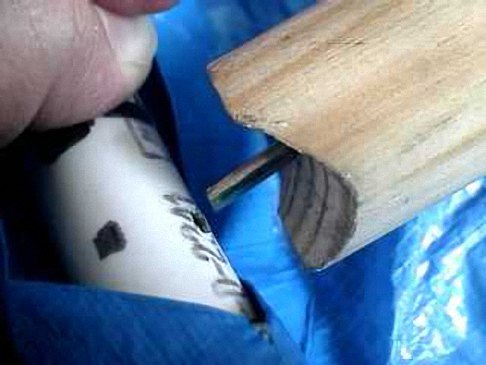
Here's how the front of the boom meets the PVC jib-bow. You'll need a hack saw to cut the head off the screw after you screw it into the boom (pre-drill the boom so it doesn't split). For a strong jib-bow, just drill through one side of the PVC.
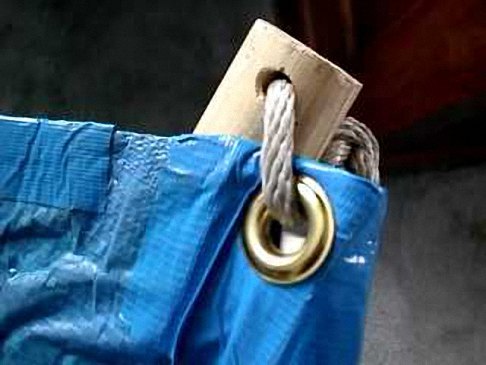
Put a brass grommet in the sail where it meets each end of the mast. I initially used the aluminum grommets that came preinstalled in the tarp, but they eventually pulled out in high wind. You need to reinforce the sail with tape on both sides before the grommet goes in.
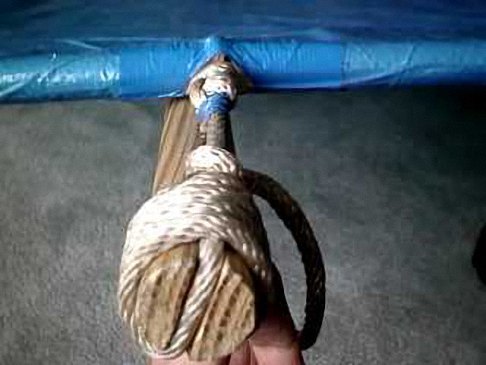
Put a groove in the end of the boom to pull the tail-bow tight. Use cotton rope, not nylon as shown. Don't drill the tail-bow, just tie the rope around it and use tape to hold the rope in place.
Skate Sailing Technique
Racing skates work best, but you can use hockey or figure skates in a pinch. You want to sail at a right angle to the direction the wind is blowing, with the sail between you and the wind. The boom rests on your shoulder. Your inside arm goes between the mast and the sail, and holds the boom about midway between the mast and the jib-bow. Your outside arm holds the mast about waist-height. Keep your inside skate about a foot further forward than your outside skate, but more of your weight on the outside skate. This position lets you recover if you hit a bump.
Start with the sail over your head, then lower the sail onto your shoulder facing straight into the wind ("luffing") with your hands as described above. Push off in the direction you want to go and twist your body like you're trying to horizontally judo-throw the sail. You should start to move. Adjust your angle to the wind by moving the sail fore or aft on your shoulder. When you approach the other side of the lake, put the sail over your head again and skate an upwind U-turn, then just lower the sail onto your other shoulder and head back.
It's a good idea to wear a helmet and kneepads.